|
|
| (18 intermediate revisions by 2 users not shown) |
| Line 1: |
Line 1: |
| − | This guide describes how to build Robocode using [http://git-scm.com/ Git], [http://maven.apache.org Maven] and [http://www.eclipse.org Eclipse]. | + | This guide describes how to build the Robocode application, i.e. the game itself. |
| | | | |
| − | This guide applies for Robocode version 1.7.4.2 and newer.
| + | == Developer's Guide for building Robocode with IntelliJ IDEA setup == |
| − | | |
| − | == Developer's Guide for building Robocode with Eclipse setup == | |
| | | | |
| | === Notice === | | === Notice === |
| | | | |
| − | This guide is intended for experienced Java developers who want to work on the Robocode game itself, and describes all basic stuff required to compile and run Robocode within the [http://www.eclipse.org Eclipse IDE]. | + | This guide is intended for experienced Java developers, who want to work on the Robocode application, and describes all the basic stuff required to compile and run Robocode within [https://www.jetbrains.com/idea/ IntelliJ IDEA]. |
| − | | |
| − | If you just want to browse the sources, you can do it from [https://github.com/robo-code/robocode here] or you can download the zipped sources from [http://sourceforge.net/projects/robocode/files/robocode%20sources/ here].
| |
| − | | |
| − | === Introduction ===
| |
| − | | |
| − | Basically, all you need to get started with building Robocode is:
| |
| − | | |
| − | * Java Developer Kit (JDK) 5.0 or newer ([http://www.oracle.com/technetwork/java/javase/downloads/index.html])
| |
| − | * The source files of Robocode ([https://github.com/robo-code/robocode])
| |
| − | * An Internet connection.
| |
| − | | |
| − | Other than that, you need to be a skilled Java developer in order to figure out how Robocode is put together. Robocode is a complex application that requires lots of time to understand and master its internal design.
| |
| − | | |
| − | An Internet connection is required for building Robocode distribution files as the build tool (Maven) needs access to [http://maven.apache.org/guides/introduction/introduction-to-repositories.html remote repositories], which contains various libraries and binaries. Some libraries are used for building Robocode, and other are used for running Robocode, and hence need to be put into the distribution files.
| |
| − | In order to get updates to the sources of Robocode when new versions emerge, an Internet connection is also critical to download changed sources and merge the changes with your version of the sources etc.
| |
| − | | |
| − | ==== Install JDK ====
| |
| − | | |
| − | Robocode is being developed in Java SE, and requires the Java Developer Kit ('''JDK''') to be pre-installed on the system used for building Robocode. Please note that a Java Runtime Environment ('''JRE''') is not enough as it does not contain the required developer tools needed for building Robocode.
| |
| − | You do not need to use the obsolete JDK 5.0, but the JDK 5.0 is used for the building official releases for Robocode as Java 5.0 is the minimum requirement for running Robocode. Compiling Robocode with the JDK 5.0 guarantees that Robocode will be able to run on Java 5.0. You can get the old Java 5.0 from [http://www.oracle.com/technetwork/java/javasebusiness/downloads/java-archive-downloads-javase5-419410.html#jdk-1.5.0_22-oth-JPR here].
| |
| − | If you just want to play with the sources, you could use a newer JDK without any trouble. But be aware that you might not be able to run your version of Robocode on older Java versions, if you builld your own version of Robocode.
| |
| − | Also note that the Sun/Oracle version of the JDK is preferable for building Robocode.
| |
| − | | |
| − | Notice that when installing the JDK, it is highly recommended that you '''install the sources provided for Java''' as the sources are very useful when debugging Robocode. However, this is not a requirement.
| |
| − | | |
| − | ==== Set up Java Environment Settings ====
| |
| − | | |
| − | You must set up the environment variable named '''JAVA_HOME''' and extend another environment variable named '''PATH'''. JAVA_HOME must be set up point to the root directory of the JDK to use. PATH is extended in order to locate the Java commands like 'java', 'javac' and lots of other tools in the JDK. This is best practice when setting up the Java development environment, and makes it possible for other tools like e.g. Maven to locate the proper JDK tools. It also makes it possible for you to detirmine which JRE that is being used when running a Java application by writting <code>java -version</code> in the command-line/shell, and detirmine which Java compiler that is being used by writting <code>javac -version</code> instead.
| |
| − | | |
| − | '''Windows:'''
| |
| − | * JAVA_HOME is set to e.g. <code>JAVA_HOME="C:\Program Files\Java\jdk1.5.0_16"</code>.
| |
| − | * PATH is extended, e.g. to <code>PATH=%JAVA_HOME%\bin;PATH</code>.
| |
| − | | |
| − | '''Linux / *nix:'''
| |
| − | * JAVA_HOME is set by e.g. <code>export JAVA_HOME=/usr/java/jdk1.5.0_07/bin/java</code>. (Bash)
| |
| − | * PATH is extended, e.g. by <code>export PATH=$JAVA_HOME/bin:$PATH</code>. (Bash)
| |
| − | | |
| − | '''Mac OS X:'''
| |
| − | * JAVA_HOME is set by e.g. <code>export JAVA_HOME=$(/usr/libexec/java_home)</code>.
| |
| − | * PATH is extended, e.g. by <code>export PATH=${JAVA_HOME}/bin:$PATH</code>.
| |
| − | | |
| − | If you want more information of how to set up your JAVA_HOME and PATH environment variables for your specific OS, please read the installation notes provided for the Sun JDK 5.0 here:
| |
| − | | |
| − | '''Installation Notes from Sun:'''
| |
| − | * [http://www.oracle.com/technetwork/java/javase/index-137561.html Installation Notes] for Windows, Linux, Solaris, and Mac.
| |
| − | * [http://www.oracle.com/technetwork/java/javase/system-configurations-135212.html Certified System Configurations for Java] for ''all'' supported systems.
| |
| − | | |
| − | ==== Required technical skills? ====
| |
| − | | |
| − | In order to develop on Robocode, you need to know the basics of these tools:
| |
| − | | |
| − | * Eclipse IDE ([http://www.vogella.com/articles/Eclipse/article.html])
| |
| − | * Git and GitHub ([http://www.vogella.com/articles/Git/article.html])
| |
| − | * Maven ([http://maven.apache.org/guides/getting-started/maven-in-five-minutes.html Maven in 5 Minutes])
| |
| − | | |
| − | Notice that you do not have to be an expert in Eclipse, Git/GitHub, and Maven. But you need some basic knowledge about these tools to understand how to build Robocode. In fact, trying to build Robocode might actually be a very good way of learning these tools, if you don't know them already or miss some practical experience with these. :-)
| |
| − | | |
| − | When you need to start editing the sources of Robocode, you naturally might want to use an IDE for compiling and run Robocode on the fly to quickly see the effect of your work. This is where [http://www.eclipse.org Eclipse IDE] comes into the picture for this guide, as many Java developers regards the Eclipse IDE as the best IDE for Java development. Eclipse comes free of charge, has a huge community, automatic compilation, a rich source code editor, a flexible window layout, and lots of plug-ins. Eclipse has been choosen as the primary IDE for building Robocode, and thus this guide only describes how to setup and build Robocode with this IDE.
| |
| − | If you want to use another IDE for developing Robocode you need to figure out how to set it up by yourself based on the details from this guide. And you are more than welcome to add a page beside this article that described how to setup everything for IDE of your choise and link to it from this article. :-)
| |
| − | | |
| − | All sources of Robocode are available at [https://github.com/robo-code/robocode GitHub]. At GitHub, you can download sources as a zipped file or create your own [https://help.github.com/articles/fork-a-repo clone/fork], if you want to.
| |
| − | | |
| − | Even though Maven is used as build tool, you don't need to pre-install it on your system. Batch (.bat) and shell (.sh) files are provided with the source files. These scripts will automatically download required libraries, scripts and tools required for building Robocode. Hence, no tools needs to be pre-installed in order to build Robocode beside the JDK and correct environment settings for JAVA_HOME and PATH.
| |
| − | | |
| − | Notice that the shell scripts (.sh files) should work under Unix and *nix like OSes including Max OS X. However, the shell scripts have only been tested under Linux (on Ubuntu), so there is no guarantee that these will run without issues on other *nix systems.
| |
| − | | |
| − | You don't have to worry too much about how to setup Eclipse for Robocode as the provided sources contains all configuration files needed by Eclipse. Some of these files are generated using Maven's build-in support for Eclipse. However, you will need to do some basic pre-configuration of Eclipse before you'll be able to get started with working on Robocode. You should only need to set up a workspace for Robocode once. However, you will need to update the sources from the remote repository on GitHub once in a while, and merge changes with your sources in order to keep up-to-date with the current versions of Robocode, i.e. the trunk/head of the Robocode sources.
| |
| − | | |
| − | === Checking out sources from GitHub ===
| |
| − | | |
| − | In the following, I assume that you want to ''check out'' the sources from GitHub using some [http://git-scm.com/downloads Git client]. This could be one of the Git GUI Clients (''git-gui'') recommended [http://git-scm.com/downloads/guis here].
| |
| − | You don't necessarily need a Git client for building Robocode, as you could simply get the sources from a plain .zip file. However, if you want to update your local source files with the newest sources from the Git repository and the ability to commit and/or merge changes, you will need to use some Git client in order to get access to files beside the files inside (Eclipse) project directories, e.g. if you want to check out the scripts located in the root of the Git repository for Robocode.
| |
| − | | |
| − | The URL of the sources at GitHub is:
| |
| − | [https://github.com/robo-code/robocode.git https://github.com/robo-code/robocode.git]
| |
| − | | |
| − | ==== How to build distribution files? ====
| |
| − | | |
| − | In order to build the distribution files containing the installer setup file (robocode-x.x.x-setup.jar) and a .zip file containing all the sources (robocode-x.x.x-src.zip) you call the '''mvnassembly''' script from the command-line when standing within the root directory of the Robocode sources.
| |
| − | | |
| − | On Windows:
| |
| − | mvnassembly
| |
| − | | |
| − | On *nix:
| |
| − | ./mvnassembly.sh
| |
| − | | |
| − | This will build the distribution files, which will be put into the sub-directory named ''robocode.distribution/target''.
| |
| − | '''mvnassembly''' is a script that compiles all sources of the Robocode game, creates javadoc html files, run test units, and finally creates the target distribution files. The first time this script is run, it will need to download a huge amount of .jar files from various Maven repositories and which contains plugins etc. used for building Robocode. So please be patient with it the first time.
| |
| − | | |
| − | === Setting up Eclipse for developing on Robocode ===
| |
| − | | |
| − | Here follows a description of how to setup Eclipse for developing on Robocode.
| |
| | | | |
| − | ==== Software Requirements for Eclipse IDE ====
| + | If you just need to study the sources, you can do it from [https://github.com/robo-code/robocode GibHub], where it is possible to download the source code as a zip file under 'Code'. |
| | | | |
| − | Here follows the recommended software needed to start developing on Robocode with the Eclipse IDE:
| + | === Requirements === |
| | | | |
| − | '''Required:'''
| + | To get started with building Robocode you need: |
| − | * Java 6 JRE/JDK or newer ([http://www.oracle.com/technetwork/java/javase/downloads/index.html download]) | + | * An Internet connection, as Robocode has dependencies to libraries that are available on public binary repositories. |
| − | * Eclipse Classic 4.2 (Juno) or newer ([http://www.eclipse.org/downloads/ download]). An older version of Eclipse, e.g. Eclipse 3.7 should also be sufficient. | + | * [https://git-scm.com/downloads Git] |
| | + | * [https://www.jetbrains.com/idea/download/ IntelliJ IDEA] |
| | + | * JDK 8, e.g. [https://adoptopenjdk.net/?variant=openjdk8 AdoptOpenJDK 8] |
| | | | |
| − | '''Highly Recommended:'''
| + | Note that JDK 8 is required for Robocode to ensure all binaries can run on Java 8. If you build a customized version of your own, you are of course free to use a newer JDK version. But notice that the build tools might not be work with newer Java versions. So you'll need to fix this by yourself. |
| − | * [http://eclipse.github.com/ GitHub for Eclipse] named [http://www.eclipse.org/egit/ EGit] 2.0.0, which is a Eclipse plug-in (installation procedure is described later).
| |
| | | | |
| − | In order to run the Eclipse IDE, a Java 6 JRE or JDK should is required/recommended. That is, the Juno release of Eclipse has been [http://www.eclipse.org/eclipse/development/readme_eclipse_4.2.html#TargetOperatingEnvironments tested] with Java 6 and Java 7.
| + | Make sure that your JAVA_HOME and PATH is set up to use the JDK 8 when building the Robocode application. There is a good guide [https://www.baeldung.com/java-home-on-windows-7-8-10-mac-os-x-linux here]. |
| | | | |
| − | The version numbers just provided here are as a kind of guarantee that these will work with the present version of Robocode (1.7.4.2) and counts for reference for this guide.
| + | === Cloning the Robocode project === |
| | | | |
| − | Please consult the [http://wiki.eclipse.org/Eclipse/Installation#Install_a_JVM installation notes] provided for Eclipse in order to find out how to install Eclipse for your specific OS.
| + | You need to download the source files for the Robocode project into your PC using Git with this command line: |
| | | | |
| − | ==== Create a workspace for Robocode ====
| + | git clone https://github.com/robo-code/robocode.git robocode-proj |
| | | | |
| − | When you have setup and installed Eclipse on your system (if you did not have it on your system already), a workspace must be created for Robocode.
| + | This downloads the Robocode source files into a directory named 'robocode-proj' into the current directory. |
| | | | |
| − | The first time you start up a newly installed Eclipse, it will ask for a directory for your workspace. I suggest that you create a workspace named '''robocode-workspace''' or similar and create the workspace on a partition or directory like e.g. <code>C:</code> (on Windows) or <code>~</code> (on Linux) - or any other directory of your choice. If you have already got a workspace, e.g. the default one suggested by Eclipse, you can create a new workspace if you wish by selecting 'File' -> 'Switch Workspace' -> 'Other...' from the menu.
| + | === Building the Robocode application === |
| | | | |
| − | ==== M2_REPO class path variable ====
| + | Robocode is built by running using Gradle standing in the 'robocode-proj' directory: |
| | | | |
| − | One of the first things you need to do in Eclipse is to set up the '''M2_REPO''' class path variable for Eclipse, which points to your local Maven 2 repository. That is, Eclipse uses the M2_REPO class path variable for locating the Maven repository containing various libraries used for compiling Robocode etc. But before you can setup the M2_REPO class path in Eclipse, you must run the 'mvnassembly' command described earlier if you have not already done that.
| + | ./gradlew build |
| | | | |
| − | When calling the 'mvnassembly' script or alternatively start off Maven within the root of the robocode sources by calling e.g. 'mvn clean install', Maven will download all required libraries from other sites into your local Maven repository. Note that you will need to locate your local Maven repository. Under Windows your Maven repository is put into your %USERPROFILE% directory, and on Linux is put into your home directory (~).
| + | This step is required to easy importing the project into IntelliJ IDEA, but also the quickest way to build and test Robocode. |
| | | | |
| − | To setup the M2_REPO class path in Eclipse, you must go to the menu bar and select 'Window' -> 'Preferences'. On the Preferences window expand the 'Java' -> 'Build Path' and select the 'Classpath Variables'. On the page for the Classpath Variables, you click on the 'New...' button, and enter ''M2_REPO'' as name. Next, you click on the 'Folder...' button and navigate to where you have your .m2/repository directory located (in %USERPROFILE% under Windows, and ~ under Linux), e.g. <code>H:/Users/Flemming/.m2/repository</code> (Windows) or <code>/home/fnl/.m2/repository</code> (Linux).
| + | === Setup Robocode for IntelliJ === |
| | | | |
| − | If or when Eclipse ask you if you want to rebuild the workspace, you select 'Yes'.
| + | First, open the 'robocode-project' directory in IntelliJ. |
| | | | |
| − | ==== Configure JRE/JDK for your workspace ====
| + | Secondly, set the JDK for the Robocode project, which needs to be JDK 8. |
| | | | |
| − | You must setup which JRE/JDK that will be used for compiling (and running) Robocode in your workspace.
| + | From the menu, select: |
| − | You do this by...
| + | File > Project Structure | Platform Settings | SDKs > + (plus sign) > Add JDK |
| − | # selecting Window -> Preferences from the menu, and then unfold and select Java -> Installed JREs and press 'Add...' on the 'Installed JREs' page.
| |
| − | # Select 'Standard VM' on the 'JRE Type' page and press 'Next >' or Enter.
| |
| − | # Press the 'Directory...' button and browse to where you have installed your JDK 5 or 6 (JDK 5 is preferable when developing on Robocode) and press 'Finish' or Enter. Make sure to select a JDK and ''not'' just a JRE.
| |
| − | # When you get back to the 'Installed JREs' page, make sure to put a check mark in the JDK you just added and press 'OK' or Enter.
| |
| | | | |
| − | ==== Using EGit for accessing the sources on GitHub ====
| + | Select the home directory of your JDK 1.8 installation. |
| | | | |
| − | The next step (which is optional) is to install [http://www.eclipse.org/egit/ Egit] into Eclipse in order to get direct access to the sources of Robocode in the GitHub repository. Notice, you'll only have read access to the sources, but could make your own Git repository if you wish to. Also notice, that you don't need to install EGit in Eclipse in order to work with the sources, as you could simply copy and import the Robocode sources into your workspace. However, it makes life easier using EGit, as you will be able to get changes made to Robocode and merge this into your local sources. | + | The last step is to align IDEA with the Gradle setup. You do this by running the 'Reload All Gradle Projects', which is available by pressing the "refresh button" with the Gradle tool window in its top-left corner. |
| − |
| |
| − | ==== Install EGit into Eclipse ====
| |
| | | | |
| − | A description of how to install EGit into Eclipse is provided [http://www.eclipse.org/egit/download/ here]. But if you are not familiar with how it is done, a description is follows here:
| + | [[File:Gradle refresh.png]] |
| | | | |
| − | # In Eclipse you must select 'Help' -> 'Intall New Software...' from the menu.
| + | === Run the Robocode application === |
| − | # Enter ''http://download.eclipse.org/egit/updates/'' into the 'Work with:' text field and press the 'Add' button or the enter key. Notice, that this update site might change, so you might have to get the updated URL from [http://www.eclipse.org/egit/download/ here] and use the one that is recommended.
| |
| − | # Now, unfold the 'Eclipse EGit Team Provider' that appears in the list below the update site you just entered.
| |
| − | # Put a checkmark into you just added and put a checkmark for the 'Eclipse EGit' and press the 'Next' button.
| |
| − | # Press 'Finish' on the window that follows and follow the instructions given by Eclipse to install this plugin. It will ask if you wish to restart Eclipse, and I recommend you to answer 'yes' in order to restart Eclipse.
| |
| − | # When Eclipse has been restarted, EGit will be ready to be used in Eclipse.
| |
| | | | |
| − | ==== Importing sources of Robocode using EGit ====
| + | You can run or debug Robocode as soon as Robocode has been set up in IntelliJ. You can launch it from the toolbar with "Robocode app" and press the "play" button for running Robocode or the "bug" button for running Robocode in debugging mode. |
| | | | |
| − | Importing the projects for Robocode into Eclipse from Git can be done from the Package Explorer, which can be opened from the menu by selecting Window -> Show View -> Package Explorer or by using the keyboard shortcut by pressing Alt+Shift+Q and P. In the Package Explorer, you...
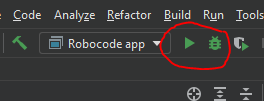
| + | [[File:Run Robocode app.png|Run Robocode app from IntelliJ]] |
| | | | |
| − | # Right-click the mouse and select 'Import...' in the popup menu that occurs.
| + | === Build the Installer for Robocode === |
| − | # Unfold 'Git' in the 'Import' window and double-click 'Projects from Git'.
| |
| − | # On the 'Import Projects from Git' you select 'URI'.
| |
| − | # On the next page named 'Source Git Repository' to enter '''https://github.com/robo-code/robocode.git''' into the 'URI:' text field and press Enter or 'Next >'.
| |
| − | # On the 'Branch Selection' page you press 'Deselect All' and select the branch you want to work on. This would normally be 'master', which is the master branch of Robocode. When the branch selection is made, you press 'Next >' or Enter.
| |
| − | # On the 'Local Destination' page, you must note the directory where your local files will be put. I recommend you use the directory suggested by EGit (Eclipse) and press 'Finish' or Enter.
| |
| − | # On the 'Select a wizard to use for importing projects', make sure 'Import existing projects' is selected and press 'Next >' or Enter.
| |
| − | # On 'Import Projects', you should deselect the first project named 'plugins' as you would normally not want to develop on plugins for Robocode - otherwise just omit deselecting 'plugins'. Press 'Finish' or Enter.
| |
| − | # All Robocode projects will now be imported into Eclipse and be visible in the Package Explorer.
| |
| − | # Now, select all projects (press Ctrl+A) and right-click the Package Explorer and select Replace With -> HEAD Revision on the popup menu that occurs, and press 'OK' or Enter to discard local changes on the dialog that appears.
| |
| | | | |
| − | Congratulations, you should now be able to get started working on the Robocode sources in Eclipse. :-)
| + | You build the Robocode installer (setup file) using Gradle from the command line: |
| | | | |
| − | ==== Launch Robocode ====
| + | ./gradlew build |
| | | | |
| − | Before launching Robocode for the first time, you should make sure that it is cleaned and compiled first. You do this by selecting Project -> Clean... from the menu. You should also make sure that you have run the 'mvnassembly' described previously, which will download and update your local Maven repository, which is necessary for compiling and running Robocode.
| + | Gradle puts the installer into /build/robocode-x.x.x.x-setup.jar |
| | | | |
| − | Please notice that it might be necessary to refresh the sources in Eclipse when files are changed outside the Eclipse editor, which is the case when running the 'mvnassembly' script. You can do this from the Package Explorer by right-clicking in this and select 'Refresh'.
| + | === Setting the version of the Robocode application === |
| | | | |
| − | In order to start running or debugging Robocode, you should select the "Bug" (debug) or "Play" (run) button in the top of Eclipse under the menu. You should press the little arrow beside these green buttons in order to choose among: Robocode, RoboRumble, TeamRumble, and MeleeRumble. The 3 last ones are for running the RoboRumble@Home clients.
| + | The version of Robocode can be changed in this file: |
| | + | \buildSrc\src\main\kotlin\net.sf.robocode.java-conventions.gradle.kts |
| | | | |
| − | ==== How to run the unit tests? ====
| + | Look for a line like this: |
| | | | |
| − | When you want to run the unit test from within Eclipse, you must do this from the the Package Explorer, where you right-click on the 'robocode.tests' project and select 'Run As' -> 'JUnit Test'. Now all available unit tests will run automatically.
| + | version = "1.9.4.2" |
| − | | |
| − | Alternatively you can start the tests from the command-line by standing on your robocode workspace, and write the following Maven command.
| |
| − | | |
| − | On Windows:
| |
| − | mvn test install
| |
| − | | |
| − | On Linux:
| |
| − | ./mvn.sh test install
| |
| | | | |
| | === Robocode developers and contributions === | | === Robocode developers and contributions === |
| | | | |
| − | Robocode developers have discussion group at robocode-developers@googlegroups.com. Everybody interested in discussion about future of Robocode are welcome. We also welcome your contributions there. The discussion group is located here: http://groups.google.com/group/robocode-developers. | + | Robocode application developers have a discussion group [http://groups.google.com/group/robocode-developers here]. Anybody interested in a discussion or advice about contributing with a feature or modification for Robocode is welcome to this group. |
| − | | |
| − | == See also ==
| |
| − | * [[Robocode/Old Developers Guide for building Robocode|Old version]] of the Developer's Guide for building Robocode for Robocode versions prior to version 1.7.
| |
| − | * [http://code.google.com/p/robocode/source/browse/ Browse the sources] of Robocode.
| |
| − | * [http://sourceforge.net/project/showfiles.php?group_id=37202&package_id=218677 Download the sources] of Robocode.
| |
| − | * [http://groups.google.com/group/robocode-developers Robocode developers discussion group].
| |
| | | | |
| − | == References ==
| |
| − | * The [http://sourceforge.net/projects/robocode Robocode project] on SourceForge.
| |
| − | * [http://sourceforge.net/svn/?group_id=37202 How to access] the SVN Repository for Robocode.
| |
| − | * [http://www.eclipse.org/ Eclipse] - an open development platform supported by Robocode.
| |
| − | * [http://maven.apache.org/ Apache Maven] used for building Robocode.
| |
| − | * [http://maven.apache.org/guides/mini/guide-ide-eclipse.html Guide] to using Eclipse with Maven 2.x.
| |
| − | * [http://www.eclipse.org/subversive/ Eclipse Subversive] is a plugin used for accessing Subversion from Eclipse.
| |
| − | * [http://subclipse.tigris.org/ Subclipse] is also a plugin used for accessing Subversion from Eclipse.
| |
| − | * [http://tortoisesvn.net TortoiseSVN], a Subversion client for Windows.
| |
| − | * [http://www.open.collab.net/downloads/subversion/ CollabNets Subversion], a Subversion client for both Windows and Linux.
| |
| | | | |
| | [[Category:Robocode Documentation]] | | [[Category:Robocode Documentation]] |
| | [[Category:Eclipse IDE]] | | [[Category:Eclipse IDE]] |
This guide describes how to build the Robocode application, i.e. the game itself.
Developer's Guide for building Robocode with IntelliJ IDEA setup
Notice
This guide is intended for experienced Java developers, who want to work on the Robocode application, and describes all the basic stuff required to compile and run Robocode within IntelliJ IDEA.
If you just need to study the sources, you can do it from GibHub, where it is possible to download the source code as a zip file under 'Code'.
Requirements
To get started with building Robocode you need:
- An Internet connection, as Robocode has dependencies to libraries that are available on public binary repositories.
- Git
- IntelliJ IDEA
- JDK 8, e.g. AdoptOpenJDK 8
Note that JDK 8 is required for Robocode to ensure all binaries can run on Java 8. If you build a customized version of your own, you are of course free to use a newer JDK version. But notice that the build tools might not be work with newer Java versions. So you'll need to fix this by yourself.
Make sure that your JAVA_HOME and PATH is set up to use the JDK 8 when building the Robocode application. There is a good guide here.
Cloning the Robocode project
You need to download the source files for the Robocode project into your PC using Git with this command line:
git clone https://github.com/robo-code/robocode.git robocode-proj
This downloads the Robocode source files into a directory named 'robocode-proj' into the current directory.
Building the Robocode application
Robocode is built by running using Gradle standing in the 'robocode-proj' directory:
./gradlew build
This step is required to easy importing the project into IntelliJ IDEA, but also the quickest way to build and test Robocode.
Setup Robocode for IntelliJ
First, open the 'robocode-project' directory in IntelliJ.
Secondly, set the JDK for the Robocode project, which needs to be JDK 8.
From the menu, select:
File > Project Structure | Platform Settings | SDKs > + (plus sign) > Add JDK
Select the home directory of your JDK 1.8 installation.
The last step is to align IDEA with the Gradle setup. You do this by running the 'Reload All Gradle Projects', which is available by pressing the "refresh button" with the Gradle tool window in its top-left corner.

Run the Robocode application
You can run or debug Robocode as soon as Robocode has been set up in IntelliJ. You can launch it from the toolbar with "Robocode app" and press the "play" button for running Robocode or the "bug" button for running Robocode in debugging mode.
Build the Installer for Robocode
You build the Robocode installer (setup file) using Gradle from the command line:
./gradlew build
Gradle puts the installer into /build/robocode-x.x.x.x-setup.jar
Setting the version of the Robocode application
The version of Robocode can be changed in this file:
\buildSrc\src\main\kotlin\net.sf.robocode.java-conventions.gradle.kts
Look for a line like this:
version = "1.9.4.2"
Robocode developers and contributions
Robocode application developers have a discussion group here. Anybody interested in a discussion or advice about contributing with a feature or modification for Robocode is welcome to this group.

