Robocode/.NET/Debug a .NET robot in Visual Studio
== Obsolete Page ==
The support for .NET is now gone!
Contents
Debugging a .NET robot in Visual Studio
This tutorial builds on top of the 'Create a .NET robot with Visual Studio' tutorial. So if you haven't read the other tutorial, you should do this first and return to this tutorial.
Introduction to debugging using breakpoints
If you are already familiar with debugging in Visual Studio, you can skip this section, which gives a brief introduction into debugging using breakpoint in Visual Studio.
Debugging is used when finding and removing "bugs" which cause a robot to behave in a way that is not intended.
Visual Studio provides a debugger that helps developers to debug their applications, our case that is robots. It is possible to set "breakpoints" in the source code. A breakpoint is a marker that signals the debugger to pause execution when the breakpoint is reached. Code beyond the breakpoint will not be executed until further (debug) instructions are provided.
A breakpoint is enabled (and disabled) by clicking on the left-most side of the Code View containing the source code to debug, or simply by pressing the F9 key on the line where a breakpoint must be toggled:

Basic instructions for the debugger are:
- Continue (F5 key), which continues execution until the next breakpoint is reached or until the code execution is completed.
- Step over (F10 key), which steps to the next line of the code.
- Step into (F11 key), which steps into a method called from the current line of execution.
- Step out (Shift+F11 key), which steps out from the current method.
In most cases, the "step over" instruction is used to step one line at a time from a breakpoint. The debugger marks the next line that will be executed with a yellow arrow. In fact, the whole line is marked with a yellow background color.

When running a robot in debug mode it is possible to examine the current state of the robot when the code execution is paused due to a breakpoint that is reached. For example, it is possible to have a look at the content of the local variables and the call stack which will be "frozen" at the exact location where the code execution has been paused.
By stepping forward in the code with the debugger beyond a breakpoint, the content of the variables and the call stack will change due to new code being executed. The debugger will mark all changed content with red, which makes it easier to observe what was changed where.
Locals:

Call stack:

Note that Visual Studio makes it possible pausing code execution on the exact point where an exception occurs. This way you do not have to guess where an exception occurs. It is also possible to set up a "watch", where you can pick one or more variables or properties to watch during the debugging. This becomes handy when you have lots of variables and properties, but only want to watch a limited set of variables/properties.
To learn more details about debugging in Visual Studio, read the documentation the documentation provided at the MSDN.
Setting up a project for debugging with Robocode
Setting up development path in Robocode
The first thing to do in order to debug a robot in Visual Studio with Robocode is to add a development path to the Debug dir of the robot. Open Robocode and go to the Development Options by selecting Options -> Preferences -> Development Options. Here, press the Add button and browse into your Debug folder of your robot (e.g. C:\MySolution\MyProject\bin\Debug) and select Open, and then press Finish on the Development Options.

By adding the file path to where the debug robot .dll is located, Robocode will be able to find and use this robot in the battle, which is being debugged. Note that it is important the select the Debug dir and not the Release dir. Otherwise, it is not possible to debug your robot with Robocode.
Set Robocode to run in debug mode
Robocode is starting up using the robocode.bat file located in your Robocode home folder.
Now, you can make a copy of this file and rename it into robocode-debug.bat.
When you need to start up Robocode in debugging mode, you should run this batch file instead of robocode.bat.
You could create a new shortcut for it, and place it on your desktop named 'Robocode debug' or similar, and double-click it,
when you need to start Robocode for debugging.
The following option must be added to the robocode-debug.bat:
-Ddebug=true
For example, you could insert the -Ddebug=true between java and -Xmx512M:
java -Ddebug=true -Xmx512M ...
The debug option instructs Robocode to run in debugging mode, which allows robots to spend unlimited time per turn in the battle, which is needed when debugging. Without this option, the robot will skip turns while debugging it and the battle might stop the robot in the battle, which will make debugging impossible.
Quick method for debugging .NET robots in Visual Studio
With the Standard or Professional edition of Visual Studio a quick method for start debugging is to:
- Open Robocode.
- Open Visual Studio with the robot solution.
- Add breakpoints in the robot source code.
- Select Debug -> Attach to Process from the menu in Visual Studio. On the 'Attach to Process' dialog that show up, choose the java.exe with the title named 'Robocode' and press the Attach button.

- In Robocode, start a new battle by pressing Ctrl+N or select Battle -> New in the menu
- Press Ctrl+R to refresh the robot DB. This way Robocode will be able to locate the robot.
- Add your robot to the new battle with an opponent robot, e.g., sample.target.
- Start debugging by pressing Start Battle.

Let Visual Studio start up Robocode when debugging
When debugging robots, it is possible to setup your solution so that Visual Studio will open Robocode automatically when debugging robots. This is what to do:
- Open Visual Studio with the robot solution.
- Choose the project with the robot to debug, and set it as startup project (right-click on the project in the Solution Explorer view and select 'Set as Startup Project').
- Open the Properties of the project (right-click on the project in the Solution Explorer view and select Properties).
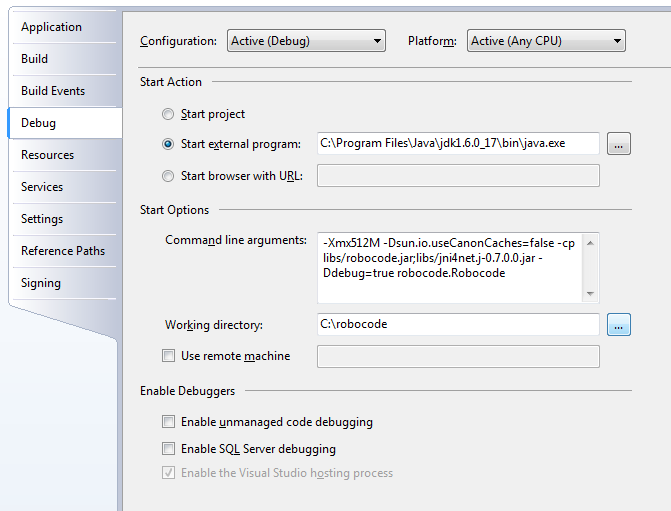
- Select the Debug tab, and click the 'Start external program' button, and put the the full file path to the
java.exethat is used for starting up Robocode, e.g.,C:\Program Files\Java\jdk1.6.0_17\bin\java.exe. - In the 'Command line arguments', put in all parameters used in the
robocode.batfile betweenjavaand *%, e.g.,-Ddebug=true -Xmx512M -Dsun.io.useCanonCaches=false -cp libs/robocode.jar;libs/jni4net.j-0.7.0.0.jar robocode.Robocode. Therobocode.batis located in the root of your Robocode home dir. Note that it is important that-Ddebug=trueexists is among the command line arguments. - Set the 'Working directory' to the full path of your Robocode home dir, e.g.,
C:\robocode. - Save the properties pressing Ctrl+S.
- Start debugging by pressing the F5 key or select Debug -> Start Debugging from the menu.

Trick to let Visual Studio Express Edition start up Robocode
With the Visual Studio 2008 Express Edition, it is not possible to start an external program from the project Debug tab in the Properties dialog, which is possible with the Standard and Professional editions of Visual Studio.
However, there is a trick that will make this possible, so you can let Visual Studio Express start up Robocode, and follow the description in the previous section of this tutorial.
First locate the .csproj file for your project within your solution dir.
For example, this file could be located within C:\MySolution\MyProject with the name MyProject.csproj.
Now, check a .csproj.user file exists in the same dir, e.g., MyProject.csproj.user.
If such file does not exist, create one with the same name as the .csproj file, but add .user and the end of the file name, e.g. MyProject.csproj.user.
Open it with a text editor, and put this into the file:
<Project xmlns="http://schemas.microsoft.com/developer/msbuild/2003">
  <PropertyGroup Condition=" '$(Configuration)|$(Platform)' == 'Debug|AnyCPU' ">
    <StartAction>Program</StartAction>
    <StartProgram>C:\Program Files\Java\jdk1.6.0_17\bin\java.exe</StartProgram>
    <StartArguments>-Ddebug=true -Xmx512M -Dsun.io.useCanonCaches=false -cp libs/robocode.jar;libs/jni4net.j-0.7.0.0.jar robocode.Robocode</StartArguments>
    <StartWorkingDirectory>c:\robocode</StartWorkingDirectory>
  </PropertyGroup>
</Project>
The StartProgram must be changed to the full path of the java.exe you use for starting Robocode.
The StartArguments must reflect the parameters used in the robocode.bat, as described in the previous section.
And finally, the StartWorkingDirectory must be the full path to your Robocode home dir.
If the .csproj.user file already existed within the project dir, the above ProperyGroup must be inserted or merged into the .csproj.user file.
Now, Robocode will start up when starting the debugger in Visual Studio Express.
If you need to change the command line arguments later, this is possible by right-clicking the robot project and select Properties, where the 'Command line arguments' and 'Working directory' can be changed:

Set a startup battle in Robocode for debugging
When setting up a new battle in Robocode when debugging a robot, the same robot should only be added once to the battle, and at least one other opponent, e.g. sample.Target must be added too. The reason why you should only add your robot once is that the debugger will jump between breakpoints in the source code, as it debugs all instances of the robot in the same time.
With Robocode it is possible to create a battle and then let Robocode start this battle automatically when Robocode is started. This is very helpful for debugging, as you don't need to start a new battle each time you start debugging.
Here is how to create and automatically start up a battle in Robocode:
- Open Robocode.
- Open the New Battle dialog by pressing Ctrl+N or selecting Battle -> New from the menu.
- Add your robot and some other robot to the battle.
- On the BattleField tab, you can set the size of the battlefield, e.g., set it to 1000x1000.
- Press the 'Start Battle' button.
- Save the battle by pressing Ctrl+Shift+S or selecting Battle -> Save As.
- Write the name of the battle in the dialog that shows up, e.g. 'debugging'.
- Open Visual Studio with your robot solution, and right-click on the project containing the robot to debug, and select Properties.
- Click on the Debug tab, and add
-battle debuggingto the 'Command line arguments', i.e.,... robocode.Robocode -battle debugging. - Save the properties pressing Ctrl+S.
- Start debugging by pressing the F5 key or select Debug -> Start Debugging from the menu.
Let Robocode run deterministically
When playing battles, Robocode will run games randomly. That is, the robots start at random positions, and the random generator pick a seed for the internal randomizer at random, meaning that battles will run differently when starting new battles. However, it is possible to set up Robocode to run deterministically so the battles will run the same way each time a new battle is started.
By running battles as deterministic, it is possible to debug a specific scenario. For example, if a robot misbehaves in round 1 at time = 500, you can make a check in your code like this:
 if (RoundNum == 1 && Time == 500)
 {
     int dummy = 0;
 }
And put a breakpoint on the line with int dummy = 0;. Now the breakpoint will be hit in the first round at time = 500.
In order to setup Robocode to run deterministically, an option must be added to options for Robocode with the
robocode-debug.bat or within the command line arguments under the Debug tab in the project Properties,
e.g. right after the -Ddebug=true option.
-DRANDOMSEED=<long value>
Where <long value> is a long (64-bit) value of your choice, e.g. 1234567890.
Setting starting positions of robots
Sometimes you might want to set the starting positions and headings of the robots participating in a battle. Well, this is also possible if a startup battle has been set up already (see earlier section here).
Using a text editor, the startup battle (e.g. debugging.battle) can be extended with a line containing the robocode.battle.initialPositions definition, which must be added.
Example of setting the robocode.battle.initialPositions:
robocode.battle.initialPositions=(50,50,0),(?,?,?),(20,30,?)
(Example taken from the intro.battle in the battle dir found in the home dir for Robocode)
The initialPositions is a comma-separated list of sets.
For each robot, the initial x and y coordinates and initial heading (in degrees) can be specified with a set in this format:
(x,y,heading)
In the example above we have 3 sets:
- (50,50,0)
- (?,?,?)
- (20,30,?)
The first set is for the first robot, next set for the second and so forth.
A question mark (?) can be used for indicating that the value must be random. In the last set (20,30,?) we want the third robot to start at position (20,30), but have a random heading.
If 5 robots are participating in the battle in the example, we only set the initial positions for the 3 first robots specified. The two remaining robots will start with random positions and headings. Also note that with the second set, we have set all values to question marks, meaning that the second robot will start with a random position and heading.
See also
Related tutorials
Robocode API
Tutorials
- Starting Robocode from the command line
- Getting started with Robocode
- My First Robot Tutorial
- The anatomy of a robot
- Robocode Game Physics
- Frequently Asked Questions (FAQ)
- Scoring in Robocode
- Articles about Robocode
- Using the robot console
- Downloading other robots
- Learning from other robots