Difference between revisions of "Robocode/Developers Guide for building Robocode"
m |
|||
| Line 54: | Line 54: | ||
You can run or debug Robocode as soon as Robocode has been set up in IntelliJ. You can launch it from the toolbar with "Robocode app" and press the "play" button for running Robocode or the "bug" button for running Robocode in debugging mode. | You can run or debug Robocode as soon as Robocode has been set up in IntelliJ. You can launch it from the toolbar with "Robocode app" and press the "play" button for running Robocode or the "bug" button for running Robocode in debugging mode. | ||
| − | [[File:Run Robocode app.png | + | [[File:Run Robocode app.png|Run Robocode app from IntelliJ]] |
=== Build the Installer for Robocode === | === Build the Installer for Robocode === | ||
Revision as of 22:12, 24 June 2021
This guide describes how to build the Robocode application, i.e. the game itself.
Developer's Guide for building Robocode with IntelliJ IDEA setup
Notice
This guide is intended for experienced Java developers, who want to work on the Robocode application, and describes all the basic stuff required to compile and run Robocode within IntelliJ IDEA.
If you just need to study the sources, you can do it from GibHub, where it is possible to download the source code as a zip file under 'Code'.
Requirements
To get started with building Robocode you need:
- An Internet connection, as Robocode has dependencies to libraries that are available on public binary repositories.
- Git
- IntelliJ IDEA
- JDK 8, e.g. AdoptOpenJDK 8
Note that JDK 8 is required for Robocode to ensure all binaries can run on Java 8. If you build a customized version of your own, you are of course free to use a newer JDK version. But notice that the build tools might not be work with newer Java versions. So you'll need to fix this by yourself.
Make sure that your JAVA_HOME and PATH is set up to use the JDK 8 when building the Robocode application. There is a good guide here.
Cloning the Robocode project
You need to download the source files for the Robocode project into your PC using Git with this command line:
git clone https://github.com/robo-code/robocode.git robocode-proj
This downloads the Robocode source files into a directory named 'robocode-proj' into the current directory.
Building the Robocode application
Robocode is built by running using Gradle standing in the 'robocode-proj' directory:
./gradlew build
This step is required to easy importing the project into IntelliJ IDEA, but also the quickest way to build and test Robocode.
Setup Robocode for IntelliJ
First, open the 'robocode-project' directory in IntelliJ.
Secondly, set the JDK for the Robocode project, which needs to be JDK 8.
From the menu, select: File > Project Structure | Platform Settings | SDKs > + (plus sign) > Add JDK
Select the home directory of your JDK 1.8 installation.
The last step is to align IDEA with the Gradle setup. You do this by running the 'Reload All Gradle Projects', which is available by pressing the "refresh button" with the Gradle tool window in its top-left corner.
Run the Robocode application
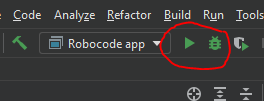
You can run or debug Robocode as soon as Robocode has been set up in IntelliJ. You can launch it from the toolbar with "Robocode app" and press the "play" button for running Robocode or the "bug" button for running Robocode in debugging mode.
Build the Installer for Robocode
You build the Robocode installer (setup file) using Gradle from the command line:
./gradlew build
Gradle puts the installer into /build/robocode-x.x.x.x-setup.jar
Setting the version of the Robocode application
The version of Robocode can be changed in this file: \buildSrc\src\main\kotlin\net.sf.robocode.java-conventions.gradle.kts
Look for a line like this:
version = "1.9.4.2"
Robocode developers and contributions
Robocode application developers have a discussion group here. Anybody interested in a discussion or advice about contributing with a feature or modification for Robocode is welcome to this group.
