Difference between revisions of "Robocode/Graphical Debugging"
(Move documentation footer to template) |
|||
| (18 intermediate revisions by 5 users not shown) | |||
| Line 1: | Line 1: | ||
| − | |||
| − | |||
This page will explain how to perform graphical debugging with [[Robocode]] using the <code>onPaint</code> method. | This page will explain how to perform graphical debugging with [[Robocode]] using the <code>onPaint</code> method. | ||
== Classic Debugging == | == Classic Debugging == | ||
| − | One classic way of debugging code is to use <code> | + | One classic way of debugging code is to use <code>out.println()</code> statements in your code and read the output in the [[Robocode/Robot Console|console]]. This classic way of debugging is excellent in most cases, especially when you want to write out information about e.g. how many times you have hit another robot compared to how many times you have missed etc. |
Another form of debugging is using a debug tool, e.g. the one that comes with [[Robocode/Eclipse/Debugging Robot|Eclipse]], where you are able to set breakpoints and create watch points etc. in your code to see how your robot behaves. With this kind of debugging you'll be able to get a "snapshot" of the current values contained by all field values of your robot. | Another form of debugging is using a debug tool, e.g. the one that comes with [[Robocode/Eclipse/Debugging Robot|Eclipse]], where you are able to set breakpoints and create watch points etc. in your code to see how your robot behaves. With this kind of debugging you'll be able to get a "snapshot" of the current values contained by all field values of your robot. | ||
| Line 12: | Line 10: | ||
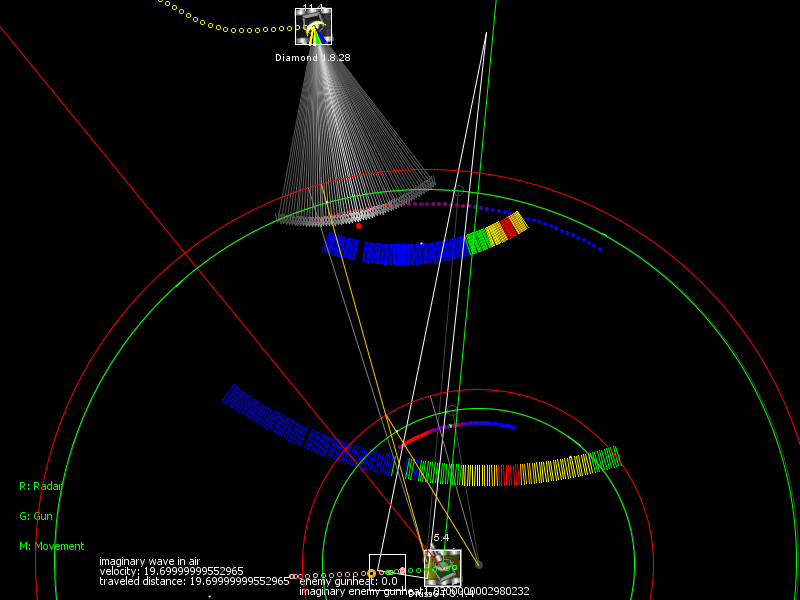
Instead of printing out for example estimated future coordinates of your robots, you can paint these coordinates as dots (or similar) on the battlefield to see how well your robot is at tracking the enemies. Basically, the can paint whatever you want on the battlefield. | Instead of printing out for example estimated future coordinates of your robots, you can paint these coordinates as dots (or similar) on the battlefield to see how well your robot is at tracking the enemies. Basically, the can paint whatever you want on the battlefield. | ||
| + | |||
| + | [[Image:DrussGTDiamondPaint.png|DrussGTDiamondPaint.png]] | ||
== Enable Painting == | == Enable Painting == | ||
| − | + | By default, the painting of all the robots is disabled. Why? Imagine 10 robots on the battlefield, who all wants to do their own paintings. The whole battle view would potentially be "polluted" with all kind of graphical stuff from each robot, which can be quite annoying, especially when you want to watch what is going on with your robot(s) on the battlefield. Therefore, you have to enable the painting of the robots, which you want to allow painting their graphics on the battlefield. However, you should expect that robots might "hide" their (debug) painting for the public, or have removed their code in order to keep the [[Codesize|code size]] small. | |
| + | |||
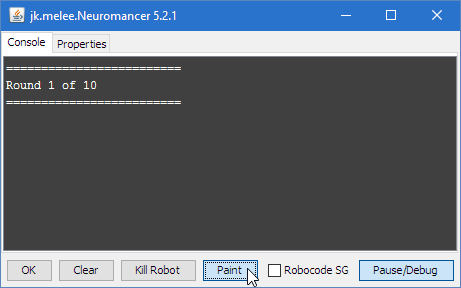
| + | In order to enable the painting (performed within the <code>onPaint()</code> method), you must open the [[Robocode/Robot Console|robot console]] of your robot and press the '''Paint button''' to enable the painting. The painting is disabled by clicking on the same button. | ||
| + | |||
| + | [[Image:EnablePaintInConsole.png]] | ||
== The onPaint() method == | == The onPaint() method == | ||
| − | In order to paint anything on the battlefield, you must override the <code>[http://robocode.sourceforge.net/docs/robocode/robocode/Robot.html#onPaint(java.awt.Graphics2D) | + | In order to paint anything on the battlefield, you must override the <code>[http://robocode.sourceforge.net/docs/robocode/robocode/Robot.html#onPaint(java.awt.Graphics2D) public void onPaint(Graphics2D g)]</code> method. This method is automatically called by [[Robocode]] each time the battlefield is being rendered (and the painting is enabled). Basically, the painting is performed by calling methods on the <code>[https://docs.oracle.com/javase/8/docs/api/java/awt/Graphics2D.html Graphics2D]</code> object given a input parameter to the <code>onPaint</code> method. So you can for example set the color to paint with, draw circles, rectangles etc., which can be both filled out and not filled out. |
=== Simple Example === | === Simple Example === | ||
So, here is an simple example of how to paint a red filled rectangle on the screen: | So, here is an simple example of how to paint a red filled rectangle on the screen: | ||
| − | + | <syntaxhighlight lang="java"> | |
| − | + | import java.awt.Color; | |
| + | import java.awt.Graphics2D; | ||
| − | + | public void onPaint(Graphics2D g) { | |
| − | + | // Set the paint color to red | |
| − | + | g.setColor(java.awt.Color.RED); | |
| − | + | // Paint a filled rectangle at (50,50) at size 100x150 pixels | |
| − | + | g.fillRect(50, 50, 100, 150); | |
| − | + | } | |
| + | </syntaxhighlight> | ||
== The Coordinate System == | == The Coordinate System == | ||
| − | If you are used to the "normal" coordinate system used with | + | If you are used to the "normal" coordinate system used with AWT and Swing, you should know that the coordinate system is mirrored to fit the coordinate system used in Robocode. This mean that if your robot is located on coordinate (x1,y1), and you paint a dot on this location (e.g. by <code>g.fillRect(x1, y1, 1, 1)</code>), then this dot will be put exactly on top of your robot. |
| − | == The debug. | + | == The debug.Tracker robot example == |
In the following a more advanced example is provided to give an idea of how the <code>onPaint()</code> method can be used. In this example we want to put a red square on top of the last scanned robot seen by our robot, and the robot does nothing else than just scanning and painting. | In the following a more advanced example is provided to give an idea of how the <code>onPaint()</code> method can be used. In this example we want to put a red square on top of the last scanned robot seen by our robot, and the robot does nothing else than just scanning and painting. | ||
=== run() method === | === run() method === | ||
So first of all, we tell our robot to do nothing else than turning the robot for ever when it is run: | So first of all, we tell our robot to do nothing else than turning the robot for ever when it is run: | ||
| − | < | + | |
| − | + | <syntaxhighlight lang="java"> | |
| − | + | // How to run our robot | |
| − | + | public void run() { | |
| − | + | // Rotate the radar forever in order to detect robots | |
| − | + | turnRadarRight(Double.POSITIVE_INFINITY); | |
| − | + | } | |
| − | + | </syntaxhighlight> | |
| − | </ | ||
=== onScannedRobot() method === | === onScannedRobot() method === | ||
| − | Then we save the last ScannedRobotEvent we receive whenever our robot scans another robot: | + | Then we save the coordinates based on the last <code>ScannedRobotEvent</code> (via the <code>e</code> parameter) we receive whenever our robot scans another robot: |
| − | |||
| − | |||
| − | |||
| − | |||
| − | // Called when we have scanned a robot | + | <syntaxhighlight lang="java"> |
| − | + | // The coordinates of the last scanned robot | |
| − | + | int scannedX = Integer.MIN_VALUE; | |
| − | + | int scannedY = Integer.MIN_VALUE; | |
| + | |||
| + | // Called when we have scanned a robot | ||
| + | public void onScannedRobot(ScannedRobotEvent e) { | ||
| + | // Calculate the angle to the scanned robot | ||
| + | double angle = Math.toRadians((getHeading() + e.getBearing()) % 360); | ||
| − | + | // Calculate the coordinates of the robot | |
| − | + | scannedX = (int)(getX() + Math.sin(angle) * e.getDistance()); | |
| − | + | scannedY = (int)(getY() + Math.cos(angle) * e.getDistance()); | |
| − | + | } | |
| − | </ | + | </syntaxhighlight> |
=== onPaint() method === | === onPaint() method === | ||
Okay, so now we just have to paint a red transparent square on top of the scanned robot: | Okay, so now we just have to paint a red transparent square on top of the scanned robot: | ||
| − | |||
| − | |||
| − | |||
| − | |||
| − | |||
| − | + | <syntaxhighlight lang="java"> | |
| − | + | // Paint a transparent square on top of the last scanned robot | |
| + | public void onPaint(Graphics2D g) { | ||
| + | // Set the paint color to a red half transparent color | ||
| + | g.setColor(new Color(0xff, 0x00, 0x00, 0x80)); | ||
| + | |||
| + | // Draw a line from our robot to the scanned robot | ||
| + | g.drawLine(scannedX, scannedY, (int)getX(), (int)getY()); | ||
| + | |||
| + | // Draw a filled square on top of the scanned robot that covers it | ||
| + | g.fillRect(scannedX - 20, scannedY - 20, 40, 40); | ||
| + | } | ||
| + | </syntaxhighlight> | ||
| + | |||
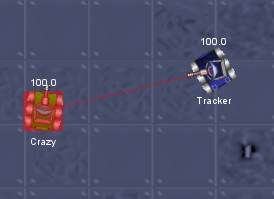
| + | So now, whenever our robots scans a robot, it paints a red line from our robot to the scanned robot and also paints a red transparent square on top of it: | ||
| − | + | [[Image:GfxDebugCrazySpotted.png|Shows some paintings (a red line and square) on the battleview, where the robot debug.Tracker has spotted the sample.Crazy robot]] | |
| − | |||
| − | |||
| − | |||
| − | + | == References == | |
| + | * [http://robocode.sourceforge.net/docs/robocode/robocode/Robot.html#onPaint(java.awt.Graphics2D) The onPaint() method] | ||
| + | * [https://docs.oracle.com/javase/8/docs/api/java/awt/Graphics2D.html Graphics2D JavaDoc] | ||
| − | == See | + | == See also == |
| − | |||
| − | |||
| − | + | {{RobocodeDocsList}} | |
| − | |||
| − | |||
[[Category:Robocode Documentation]] | [[Category:Robocode Documentation]] | ||
| + | [[Category:Tutorials]] | ||
[[Category:Debugging]] | [[Category:Debugging]] | ||
| − | |||
Latest revision as of 16:25, 17 August 2017
This page will explain how to perform graphical debugging with Robocode using the onPaint method.
Contents
Classic Debugging
One classic way of debugging code is to use out.println() statements in your code and read the output in the console. This classic way of debugging is excellent in most cases, especially when you want to write out information about e.g. how many times you have hit another robot compared to how many times you have missed etc.
Another form of debugging is using a debug tool, e.g. the one that comes with Eclipse, where you are able to set breakpoints and create watch points etc. in your code to see how your robot behaves. With this kind of debugging you'll be able to get a "snapshot" of the current values contained by all field values of your robot.
Graphical Debugging
However, Robocode provides an additional and very powerful way of debugging your robot. That is graphical debugging, where you can paint graphics for you robot on top of the graphics that is being rendered on the battle view. In some cases, this kind of debugging provides you with better view of how your robot "sees" the world surrounding it.
Instead of printing out for example estimated future coordinates of your robots, you can paint these coordinates as dots (or similar) on the battlefield to see how well your robot is at tracking the enemies. Basically, the can paint whatever you want on the battlefield.
Enable Painting
By default, the painting of all the robots is disabled. Why? Imagine 10 robots on the battlefield, who all wants to do their own paintings. The whole battle view would potentially be "polluted" with all kind of graphical stuff from each robot, which can be quite annoying, especially when you want to watch what is going on with your robot(s) on the battlefield. Therefore, you have to enable the painting of the robots, which you want to allow painting their graphics on the battlefield. However, you should expect that robots might "hide" their (debug) painting for the public, or have removed their code in order to keep the code size small.
In order to enable the painting (performed within the onPaint() method), you must open the robot console of your robot and press the Paint button to enable the painting. The painting is disabled by clicking on the same button.
The onPaint() method
In order to paint anything on the battlefield, you must override the public void onPaint(Graphics2D g) method. This method is automatically called by Robocode each time the battlefield is being rendered (and the painting is enabled). Basically, the painting is performed by calling methods on the Graphics2D object given a input parameter to the onPaint method. So you can for example set the color to paint with, draw circles, rectangles etc., which can be both filled out and not filled out.
Simple Example
So, here is an simple example of how to paint a red filled rectangle on the screen:
import java.awt.Color;
import java.awt.Graphics2D;

public void onPaint(Graphics2D g) {
    // Set the paint color to red
    g.setColor(java.awt.Color.RED);
    // Paint a filled rectangle at (50,50) at size 100x150 pixels
    g.fillRect(50, 50, 100, 150);
}
The Coordinate System
If you are used to the "normal" coordinate system used with AWT and Swing, you should know that the coordinate system is mirrored to fit the coordinate system used in Robocode. This mean that if your robot is located on coordinate (x1,y1), and you paint a dot on this location (e.g. by g.fillRect(x1, y1, 1, 1)), then this dot will be put exactly on top of your robot.
The debug.Tracker robot example
In the following a more advanced example is provided to give an idea of how the onPaint() method can be used. In this example we want to put a red square on top of the last scanned robot seen by our robot, and the robot does nothing else than just scanning and painting.
run() method
So first of all, we tell our robot to do nothing else than turning the robot for ever when it is run:
// How to run our robot
public void run() {
    // Rotate the radar forever in order to detect robots
    turnRadarRight(Double.POSITIVE_INFINITY);
}
onScannedRobot() method
Then we save the coordinates based on the last ScannedRobotEvent (via the e parameter) we receive whenever our robot scans another robot:
// The coordinates of the last scanned robot
int scannedX = Integer.MIN_VALUE;
int scannedY = Integer.MIN_VALUE;

// Called when we have scanned a robot
public void onScannedRobot(ScannedRobotEvent e) {
    // Calculate the angle to the scanned robot
    double angle = Math.toRadians((getHeading() + e.getBearing()) % 360);

    // Calculate the coordinates of the robot
    scannedX = (int)(getX() + Math.sin(angle) * e.getDistance());
    scannedY = (int)(getY() + Math.cos(angle) * e.getDistance());
}
onPaint() method
Okay, so now we just have to paint a red transparent square on top of the scanned robot:
// Paint a transparent square on top of the last scanned robot
public void onPaint(Graphics2D g) {
    // Set the paint color to a red half transparent color
    g.setColor(new Color(0xff, 0x00, 0x00, 0x80));

    // Draw a line from our robot to the scanned robot
    g.drawLine(scannedX, scannedY, (int)getX(), (int)getY());

    // Draw a filled square on top of the scanned robot that covers it
    g.fillRect(scannedX - 20, scannedY - 20, 40, 40);
}
So now, whenever our robots scans a robot, it paints a red line from our robot to the scanned robot and also paints a red transparent square on top of it:
References
See also
Robocode API
Beginner Guides
- Welcome to Robocode
- System requirements
- Download and install
- Getting started
- Frequently asked questions
- My First Robot tutorial
- Game physics
- The anatomy of a robot
- Scoring in Robocode
- Using the robot console
- Downloading other robots
- Learning from other robots
- Package your robot
- Articles about Robocode
- Starting Robocode from the command line
- Graphical debugging
External Editors
- Using Eclipse with Robocode
- Creating a project in Eclipse
- Creating a robot in Eclipse
- Running your robot from Eclipse
- Debugging your robot with Eclipse
- Using NetBeans with Robocode
- Using Gradle with Robocode


