Difference between revisions of "Robocode/Robot Anatomy"
< Robocode
Jump to navigation
Jump to search
m (→Tutorials) |
m (→Tutorials) |
||
| Line 27: | Line 27: | ||
* [[Robocode/Console Usage|Starting Robocode from the command line]] | * [[Robocode/Console Usage|Starting Robocode from the command line]] | ||
* [[Robocode/Graphical_Debugging|Graphical debugging]] | * [[Robocode/Graphical_Debugging|Graphical debugging]] | ||
| − | * [[Robocode/ | + | * [[Robocode/Eclipse|Using Eclipse as IDE]] |
* [[Robocode/Eclipse/Create_a_Project|Creating a project for your robots]] | * [[Robocode/Eclipse/Create_a_Project|Creating a project for your robots]] | ||
* [[Robocode/Eclipse/Create_a_Robot|Creating a robot in Eclipse]] | * [[Robocode/Eclipse/Create_a_Robot|Creating a robot in Eclipse]] | ||
Revision as of 23:16, 10 October 2008
Robot Anatomy
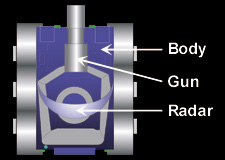
A robot consists of three individual parts:
- Body - Carries the gun with the radar on top. The body is used for moving the robot ahead and back, as well as turning left or right.
- Gun - Mounted on the body and is used for firing energy bullets. The gun can turn left or right.
- Radar - Mounted on the gun and is used to scan for other robots when moved. The radar can turn left or right. The radar generates onScannedRobot events when robots are detected.
See also
Tutorials
- System Requirements for Robocode
- How to download and install Robocode
- Getting started with Robocode
- My First Robot Tutorial
- Robocode Game Physics
- Scoring in Robocode
- Using the robot console
- Downloading other robots
- Learning from other robots
- Package your robot
- Frequently Asked Questions (FAQ)
- Articles about Robocode
- Starting Robocode from the command line
- Graphical debugging
- Using Eclipse as IDE
- Creating a project for your robots
- Creating a robot in Eclipse
- Running your robot from Eclipse
- Debugging your robot with Eclipse
