Difference between revisions of "Robocode/Getting Started"
< Robocode
Jump to navigation
Jump to search
(→Tutorials: Removed links) |
m (→Tutorials: Added System Requirements) |
||
| Line 18: | Line 18: | ||
=== Tutorials === | === Tutorials === | ||
| + | * [[Robocode/System_Requirements|System Requirements]] | ||
* [[Robocode/Robot Anatomy|The anatomy of a robot]] | * [[Robocode/Robot Anatomy|The anatomy of a robot]] | ||
* [[Robocode/My First Robot|My First Robot Tutorial (Java)]] | * [[Robocode/My First Robot|My First Robot Tutorial (Java)]] | ||
Revision as of 22:47, 5 July 2010
Getting Started
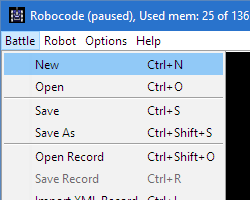
First, let's run a battle to see what the game looks like. Simply click the Battle menu, then select New, as shown on the picture here:
You'll be presented with the New Battle screen, where you pick the robots and options for a battle. For this battle, we'll try out MyFirstRobot, RamFire, and Tracker. Add them in by double-clicking on their names (or selecting each one and clicking Add) The screen should now look something like this:
See the Number of Rounds box in the middle?
In Robocode, each battle consists of a number of rounds, as you'll see soon. For now, we'll leave it at the default of 10.
Finally, click on the Start Battle button to begin! Watch for Tracker's little dance as he wins rounds.
See also
Tutorials
- System Requirements
- The anatomy of a robot
- My First Robot Tutorial (Java)
- Create a .NET robot with Visual Studio
- Robocode Game Physics
- Scoring in Robocode
- Using the robot console
- Downloading other robots
- Learning from other robots
- Package your robot (Java)
- Frequently Asked Questions (FAQ)
- Articles about Robocode
- Starting Robocode from the command line
- Graphical debugging
- Using Eclipse as IDE
- Creating a project for your robots in Eclipse
- Creating a robot in Eclipse
- Running your robot from Eclipse
- Debugging your robot with Eclipse

