Robocode/.NET/Create a .NET robot with Visual Studio
This page is a tutorial describing how to create a .NET robot with Visual Studio C# 2008 Express Edition.
Contents
- 1 Creating a .NET robot in Visual Studio
- 1.1 Prerequisites
- 1.2 Creating a VS solution for your robot
- 1.3 Setting up Project References
- 1.4 Creating your first robot class
- 1.5 The robot naming convention used in Robocode
- 1.6 Setting assembly name and default namespace
- 1.7 Running the robot in Robocode
- 1.8 Documentation
- 1.9 Known issues and solutions
- 2 See also
Creating a .NET robot in Visual Studio
From version 1.7.2.0, Robocode supports robots that run under Microsoft .NET framework CLR. Note that .NET robots will only be able to run on operating systems that support the .NET framework 2.0.
This turotial assumes that you are familiar with .NET programming. In addition, this tutorial is made for C# programmers, but it should be easy to use this tutorial for Visual Basic .NET or other .NET programming languages instead.
Prerequisites
- Robocode and Java must be installed on your system (see System Requirements and Download).
- .NET plug-in for Robocode must be installed on top of your existing Robocode directory. The .NET plug-in is named like this: robocode.dotnet-xxxx-setup.jar, and you can install it by double-clicking on it, which will start the installer.
- Visual Studio 2005 or newer is required, but Visual Studio 2008 is strongly recommended. You can download one of the Express Edition, which comes for free.
Note that you don't need Visual Studio for developing .NET robots. You can use Microsoft .NET SDK 2.0 if you wish. However, this tutorial will make use of Visual Studio C# 2008 Express Edition, and hence already have it downloaded and installed.
Creating a VS solution for your robot
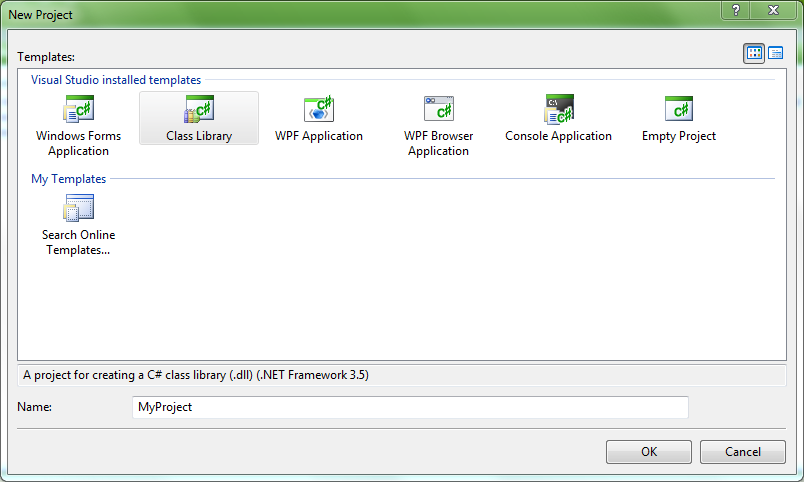
Open Visual Studio and create a new project (File -> New Project... Ctrl+Shift+N), and select the template named 'Class Library'. Specify a name for your project that makes sense, e.g. 'MyProject', and press OK.
Robocode is only able to load .NET robot from .dll file, so your project must be 'Class Library' that is assembled into a .dll. file. In this tutorial, we will use 'MyProject' as project name.
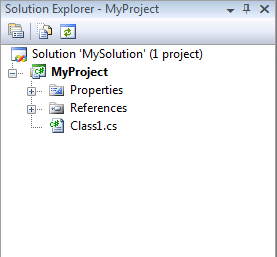
Next, save the project into a new solution to any location of your choice. This way you know exactly where it is located, which will be important later when you want to run your robot inside Robocode. To do this you have to select 'MyProject' in Solution Explorer and select File -> Save MyProject as...
In this example, we will save our project MyProject under C:\ and name our entire solution 'MySolution'.
Note that a single solution can contain multiple projects, which is very useful if you want to develop more robots.
Setting up Project References
Make sure that you have the Solution Explorer view open, which is typically located at the right side of VS. If it is not present, you can open it from the menu (View -> Solution Explorer Ctrl+W, S).
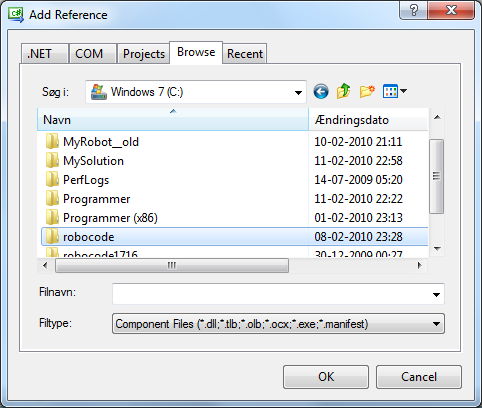
You need to add a reference to the robocode.dll file located under the \libs folder of your home folder for Robocode, e.g. C:\robocode (default home dir of Robocode).
Otherwise, Visual Studio will not know anything about the robot API provided with Robocode, and hence will not be able to build a Robocode robot for you.
Right-click the References in the Solution Explorer and select 'Add Reference...'.
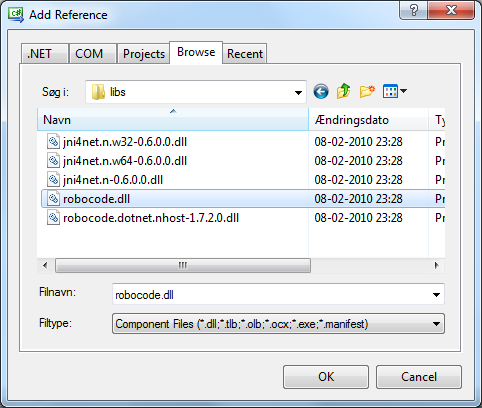
In the Add Reference dialog that appears, select the Browse pane and browse into the \libs folder of your robocode home folder.
Now you select the robocode.dll file and press OK.
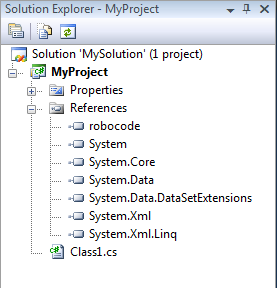
When this is done, 'robocode' should show up under the References of your Solution Explorer.
Creating your first robot class
Now we are ready for creating our main robot class.
In the Solution Explorer, a class named Class1.cs has already been provided and contains some example code.
Delete this class by right-clicking on it in the Solution Explorer, select Delete and press OK on the dialog that follows.
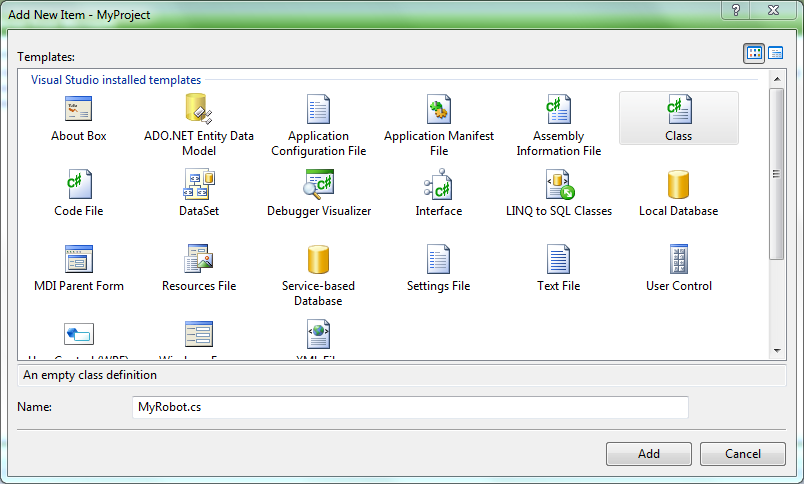
Now we create a new class for your robot called MyRobot.cs.
Right-click on MyProject in the top of the Solution Explorer and select Add -> Class...
On the Add New Item dialog that shows up, select 'Class' and set the name of this class in the buttom of the dialog to MyRobot.cs and press Add.
Note: If you need more classes for your robot later, you can add these classes to your solution in the same way.
After you have added your new class, MyRobot.cs, this source file will be automatically opened in Visual Studio and ready to be edited.
Your new source file will contain this initial code:
 using System;
 using System.Collections.Generic;
 using System.Linq;
 using System.Text;

 namespace MyProject
 {
     class MyRobot
     {
     }
 }
It contains some general 'using' declarations to standard system libraries, and it defines a class named MyRobot within the namespace named MyProject. We are now ready to put some additional code into our source file so our robot can make some action.
First we need to add a new 'using' declaration for Robocode, which we can add right after the 'using System' declarations:
using Robocode;
This will give your robot access to the public Robocode API.
Secondly, you should change the namespace so MyProject is replaced with your initials, nickname, handle or similar. In this example, we use Fnl's initials which is FNL:
namespace FNL {
Then we need to specify which robot type your class my inherit from. In this example we use the simple robot type named Robot:
class MyRobot : Robot
The main method of your robot is the Run method. In this method you control your robot by calling robot command like e.g., Ahead(), TurnLeft() or TurnGunRight() etc.
Note that it is important that your Run method runs in a loop, meaning that it should have a loop likes while (true) while will make your robot run forever.
If you do not have a loop, your robot will stop as soon as the Run method has finished the execution.
If you need some initialization for your robot that should be executed when your robot is started, you should put this code before your loop.
 // Your Run method must be public, is void, and must override the Run() method from the super class
 public override void Run()
 {
     // Perform your initialization for your robot here

     while (true)
     {
         // Perform robot logic here calling robot commands etc.
     }
 }
Here is an example of how the Run method could look like:
 // The main method of your robot containing robot logics
 public override void Run()
 {
     // -- Initialization of the robot --

     // Here we turn the robot to point upwards, and move the gun 90 degrees
     TurnLeft(Heading - 90);
     TurnGunRight(90);

     // Infinite loop making sure this robot runs till the end of the battle round
     while (true)
     {
         // -- Commands that are repeated forever --

         // Move our robot 5000 pixels ahead
         Ahead(5000);

         // Turn the robot 90 degrees
         TurnRight(90);

         // Our robot will move along the borders of the battle field
         // by repeating the above two statements.
     }
 }
Your robot is also able to react on events. In order to react on a specific event, you must provide an event handler for the specific event.
Here is an example of a simple event handler that is specific to the ScannedRobotEvent, which occur when your robot scans another robot:
 // Robot event handler, when the robot sees another robot
 public override void OnScannedRobot(ScannedRobotEvent e)
 {
     // We fire the gun with bullet power = 1
     Fire(1);
 }
If this example, the robot fires a bullet as soon as it sees another robot.
Let us put everything together. Our complete robot follows here, and you could copy & paste this code into your MyRobot.cs source file in order to try it out:
 // Access to standard .NET System
 using System;
 using System.Collections.Generic;
 using System.Linq;
 using System.Text;

 // Access to the public Robocode API
 using Robocode;

 // The namespace with your initials, in this case FNL is the initials
 namespace FNL
 {
     // The name of your robot is MyRobot, and the robot type is Robot
     class MyRobot : Robot
     {
         // The main method of your robot containing robot logics
         public override void Run()
         {
             // -- Initialization of the robot --

             // Here we turn the robot to point upwards, and move the gun 90 degrees
             TurnLeft(Heading - 90);
             TurnGunRight(90);

             // Infinite loop making sure this robot runs till the end of the battle round
             while (true)
             {
                 // -- Commands that are repeated forever --

                 // Move our robot 5000 pixels ahead
                 Ahead(5000);

                 // Turn the robot 90 degrees
                 TurnRight(90);

                 // Our robot will move along the borders of the battle field
                 // by repeating the above two statements.
             }
         }

         // Robot event handler, when the robot sees another robot
         public override void OnScannedRobot(ScannedRobotEvent e)
         {
             // We fire the gun with bullet power = 1
             Fire(1);
         }
     }
 }
The robot naming convention used in Robocode
In Robocode we use a naming convention, where you must put your robot into a namespace, and this namespace should be somewhat unique and identify you, e.g., your initials, nickname or handle.
The reasons for this naming convention are:
- Robots can share the same name as long as they live in different namespaces.
- If you create more robots, your initials/nickname should be used for all your robots, and other people will be able to see exactly which robots belong to you.
- It will be easy for you to find your robot(s) in Robocode among lots of other robots, as you just need to look out for your initials/nickname in the 'Packages' in the New Battle dialog in Robocode.
- Robocode needs a namespace to save data. The global namespace is not allowed.
Robot names are typically written in this format:
<your initials>.<robot name>_<robot version>
So if we take the robot from this tutorial and make it version 1.0, its full robot name will be: FNL.MyRobot_1.0
Transferring this to source code, could be written as:
namespace FNL { class MyRobot {} }
Setting assembly name and default namespace
As mentioned in the beginning of this tutorial, your robot will be assembled into a .dll file. Hence, you need to give it a name that follows the naming conventions of Robocode. This will ensure that the name of your .dll will not colide with .dll names from other robots if you ever upload your robot to the web or some robot repository, or if you want to participate in battles with other robots, e.g., tournaments.
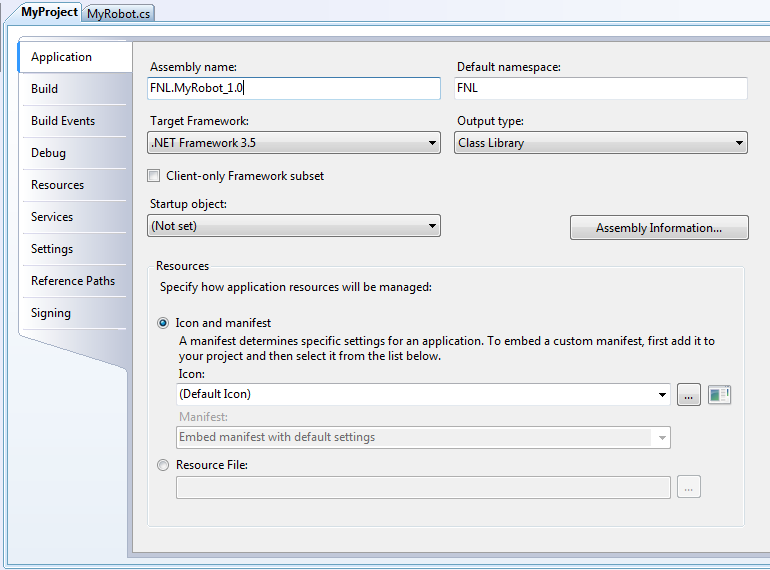
Right-click the MyProject in the Solution Explorer and select Properties. Make sure the Application pane of the Properties window is the one that is active.
First enter the full name of your robot in the 'Assembly name' text field, which is FNL.MyRobot_1.0 for the robot in this tutorial.
Second, enter the namespace/initials for the robot under the 'Default namespace' text filed, which is FNL in our case.
When you want to create a new version of your robot, you can just change the assembly name to reflect the new version in the Properties window before building your robot.
Double-click your MyRobot.cs file to return to the source code editor.
Running the robot in Robocode
After you have finished your robot, you must build it successfully in order to run it in Robocode. You can build your robot by right-clicking the solution 'Solution 'MySolution' (1 project)' in the Solution Explorer and select 'Build Solution' or simply press the F6 key. Make sure your robot builds without any errors, if not make the necessary corrections in the source file until it was build successfully.
When your robot has been build, a .dll file has been created for your robot, which is located in the ..\bin\Release folder.
In our example, that is C:\MyRobot\MyRobot\MyRobot\bin\Release where the output .dll is named 'FNL.MyRobot_1.0.dll',
if the Properties for the robot was set up correctly.
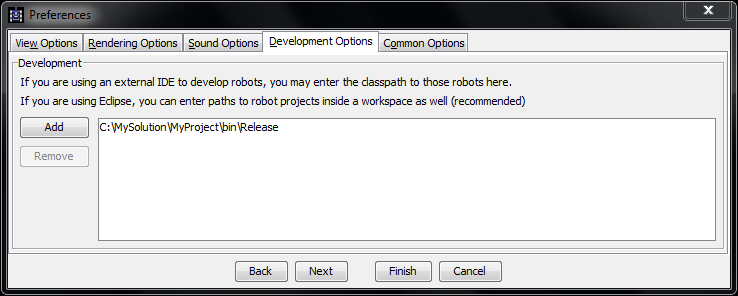
Now start Robocode and go to the Development Options by selecting Options -> Preferences -> Development Options. Here press the Add button and browse into your Release folder of your robot (e.g. C:\MySolution\MyProject\bin\Release) and select Open, and then press Finish on the Development Options.
By adding the file path to where your output robot .dll is located, Robocode will be able to find and use your robot in the battle. This becomes handy if you keep both Visual Studio and Robocode open when developing robot, as you can just rebuild your robot and start a new battle to see how your robot behaves with your changes.
When you have added the file path to where your robot .dll is located, you can start a new battle with your robot. Select Battle -> New from the Robocode menu or press Ctrl+N to open the New Battle dialog. Your robot should show up under 'Packages' with namespace you use for your robot, e.g., FNL. After this package is selected, the (class) name of your robot will be shown up under 'Robots' section.
Select your robot, and press 'Add ->' to add your robot to the new battle. You have to select at least one opponent for your robot, which could be your own robot, or one of the sample robot that comes with Robocode, e.g., sample.Corners. Press 'Start Battle' to start the battle.
Documentation
The documentation of the entire Robot API is available as a help file named 'RobotAPI.chm', which is located in the root of your robocode home folder. The Robot API is also available as HTML on the web.
Currently, the .NET feature of Robocode is totally new, and hence there is no documentation available for how to develop robots specific to .NET. However, there is lots of documentation available here at the RoboWiki. Currently, all documentation about developing robots assumes you develop your robot in Java. But this should not scare you off, as it should be easy to translate the Java code into .NET code.
The Robot API for .NET is very similar to the one available for Java. The main difference is that method names starts with a small capital letter in Java, and the Robot API for .NET makes use of properties instead of get and set methods in Java. Hence it is possible to translate source code from Java to .NET and vice versa.
Known issues and solutions
If you experience problems with starting up Robocode, it could be caused by a non-existing development path, e.g., if you have added a path previously, and then deleted this later without first removing it using the Development Options in Robocode.
To fix this problem, you should open the robocode.properties file located under the \config folder of in your Robocode home dir with a plain text editor, e.g., Notepad or similar.
Remove the file paths after the equal sign (=) with the line starting with robocode.options.development.path.
Now you should be able to start to start up Robocode again. But you'll need to add the file path(s) to your robot .dll(s) again.
See also
Robocode API
Tutorials
- System Requirements for Robocode
- How to download and install Robocode
- The anatomy of a robot
- Robocode Game Physics
- Frequently Asked Questions (FAQ)
- Getting started with Robocode
- My First Robot Tutorial
- Scoring in Robocode
- Articles about Robocode
- Using the robot console
- Downloading other robots
- Learning from other robots
- Starting Robocode from the command line
